git 102 - Branching and Merging
Jan 1, 2019 • 1386 words • 7 min read
New year new post! Happy New Year!
In the previous post I wrote about the most basics bits of git: Setting up your repo and doing the first commits.
This post will be about another basic functionality, branches: What they are, how to create them, switch between them and merge changes from one to the other.
Table of contents
What is a branch
Branches are simply pointers to commits.
This falls under the "Things I wish I knew when I started" category because it's a very simple concept but something that once you know it, everything suddenly make more sense.
How git stores stuff
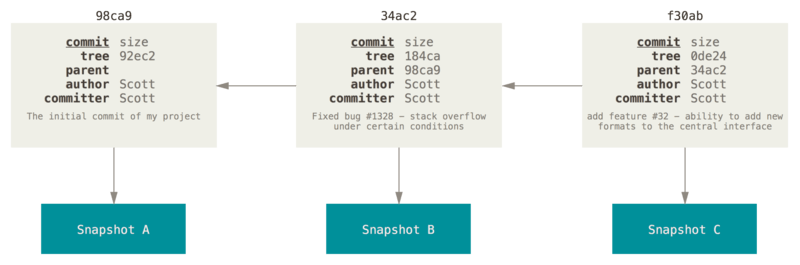
Let's see a simplified version of how git stores stuff. You can find a more detailed explanation here.
When you commit something, git takes a snapshot of your work and stores it along with some other meta-data around it, such as the commit message, who and when created it and a reference to its parent commit:
Each commit is uniquely identified by a hash which depends on all the information it has stored.
To see this information for our last commit run git show -s
$ git show -s
commit 010d81ee4fa3a8e04de8762516d7061e47a10181 (HEAD -> master)
Author: sakis <[email protected]>
Date:   Sun Nov 18 12:59:34 2018 +0000

    Change hello world message
The important bit here is inside the parentheses in the first line. As I said earlier, a branch is simply a pointer to a
specific commit. Every time you commit, your current branch will point to this new commit. The HEAD is another pointer which
always points to the commit you are currently looking, which will usually be your current branch.
Creating new branches
Now let's create a new branch with git branch testing-branch and run git show -s again:
$ git branch testing-branch
$ git show -s
commit 010d81ee4fa3a8e04de8762516d7061e47a10181 (HEAD -> master, testing-branch)
Author: sakis <[email protected]>
Date:   Sun Nov 18 12:59:34 2018 +0000

    Change hello world message
Notice how we have 2 pointers (branches) at the same commit and HEAD is still pointing at master because we haven't
changed branches yet.
Run git checkout testing-branch to switch to the new branch, create a new commit and use git show -s --all to show
all the branches:
$ git checkout testing-branch
Switched to branch 'testing-branch'
$ touch new-file-for-branches
$ git add new-file-for-branches
$ git commit -m "New commit in branch"
$ git show --all -s
commit 010d81ee4fa3a8e04de8762516d7061e47a10181 (master)
Author: sakis <[email protected]>
Date:   Sun Nov 18 12:59:34 2018 +0000

    Change hello world message

commit 938b6bce715a88c8dfeb4da99b0272e62c95e9b2 (HEAD -> testing-branch)
Author: sakis <[email protected]>
Date:   Tue Jan 1 20:41:11 2019 +0000

    New commit in branch
As expected, since we're now on the new branch the HEAD is pointing to it, while master still points to our old
commit.
- Tip: use
git checkout -b <BRANCH_NAME>to create a new branch and switch to it. This saves you a command and in 99% of the times is what you want to do.
Also try git log to see how it looks now. Add --oneline for a more compact view of your history.
Merging changes between branches
When things go well
At some point you will want to get your changes from your branch back into master. In most cases all you need to do is go to
the branch you want to pull the changes into and run git merge <BRANCH_TO_MERGE_FROM>. In our case we want to
merge the changes from testing-branch into master:
$ git checkout master
Switched to branch 'master'
$ git merge testing-branch
Updating 010d81e..938b6bc
Fast-forward
 new-file-for-branches | 0
 1 file changed, 0 insertions(+), 0 deletions(-)
 create mode 100644 new-file-for-branches
$ ls
hello.txt new-file-for-branches
Now master includes the new-file-for-branches file that was created in the other branch.
Conflict resolution
While git is usually quite good in detecting how things should be merged and what you intended to do, nevertheless you may end up in a situation where a file was changed in both branches and git will ask you to fix the conflicts it ran into.
Let's add a line to our new file in master...
$ echo "New line in master" >> new-file-for-branches
$ git commit -am "Add new line on master branch"
[master 844fce8] Add new line on master branch
 1 file changed, 1 insertion(+)
...checkout the previous branch, add a different line there...
$ git checkout testing-branch
Switched to branch 'testing-branch'
$ echo "New line in testing-branch" >> new-file-for-branches
$ git commit -am "Add new line on testing-branch branch"
[testing-branch f2361eb] New line on testing-branch branch
 1 file changed, 1 insertion(+)
and try merging as we did above...
$ git checkout master
Switched to branch 'master'
$ git merge testing-branch
Auto-merging new-file-for-branches
CONFLICT (content): Merge conflict in new-file-for-branches
Automatic merge failed; fix conflicts and then commit the result.
As expected, this time things didn't go so well.
Git saw that the file contained different changes on the same place and doesn't know how to handle it. If you run git status the status of the file is "both modified" which means that both branches have modified this
file.
At this stage if you open the file, you will see that git has pulled in both changes, added some markers as to where each one came from and is waiting for you to decide what you want to do:
$ cat new-file-for-branches
<<<<<<< HEAD
New line in master
=======
New line in testing-branch
>>>>>>> testing-branch
This tells us that the commit that we started this merge from (denoted by HEAD) introduced the changes that appear all the
way until the ======. From the ====== until the >>>>> testing-branch marker are the changes introduced by that branch.
We can edit the file and decide if we want to keep both changes or choose only one of them. Once we are ready we mark the file as ready to be committed and we proceed with the commit:
$ cat new-file-for-branches
New line in master
New line in testing-branch
$ git add new-file-for-branches
$ git commit
[master bf5d03a] Merge branch 'testing-branch'
This creates a new commit which is the result of the combined changes of the 2 branches.
You can see a nice "tree" representation of your history by running git log --graph --oneline:
$ git log --graph --oneline
*   bf5d03a (HEAD -> master) Merge branch 'testing-branch'
|\
| * f2361eb (testing-branch) New line on testing-branch branch
* | 844fce8 Add new line on master branch
|/
* 938b6bc New commit in branch
* 010d81e Change hello world message
* 7c7de26 Add hello world file
You can see here how our last commands caused the history to diverge and how it was brought back together.
Cheatsheet
git initInitialize a repogit add <filename/path>Add the file or the files in the staging area, ready to be committed.git commitCommit anything that is in the staging area. If you omit-m <message>your default editor will open for you to type your commit message.git logWill show your repo's history. Add-pto view the diffs. Add--graphto see a graph. Add--onelinefor more compact output.git showWill show you a single commit's details. Defaults toHEAD. Add-sto hide the diff. Add--allto show details of all the commits that have branches pointed at them.git branch BRANCH_NAMEWill create a branch calledBRANCH_NAME. Add-dto delete the branch.git checkout BRANCH_NAMEWill switch you to use the branchBRANCH_NAME. Add-bto also create the branch.git merge BRANCH_NAMEWill merge the changes ofBRANCH_NAMEto your current branch.git statusWill show you the status of the files that git is tracking.